Apple has released its Bone Ten ten.viii Mountain Lion (see CNET's full review) and it'south available for download from the Mac App Store on systems running Os X 10.half dozen.half dozen or after. If y'all're interested in the new OS, then be certain to read our guide on preparing your Mac for installing the upgrade, which includes data on the Bone requirements, bankroll up, and clearing upward resolvable problems before performing the upgrade.
You also might be interested in creating a standalone install drive for Mountain Lion. As with Os X Lion, Apple will likely release USB drives containing a bootable Mountain Lion installer, but this will cost you lot more than than the App Store download. Additionally, while Apple'southward Os should exist bachelor using Apple's diverse Internet recovery options, this can ofttimes take a long fourth dimension to download, specially if yous exercise not have the fastest broadband connections available to you.
We previously outlined how to create your own OS X install drive when Os Ten Lion was released, and the procedure for Mountain Lion is for the most function the same. However, when following the procedure for King of beasts y'all might come across a snag that will prevent the drive from beingness created. Therefore, to create a standalone USB or optical media install drive for Os X x.8 Mountain Panthera leo, do this:
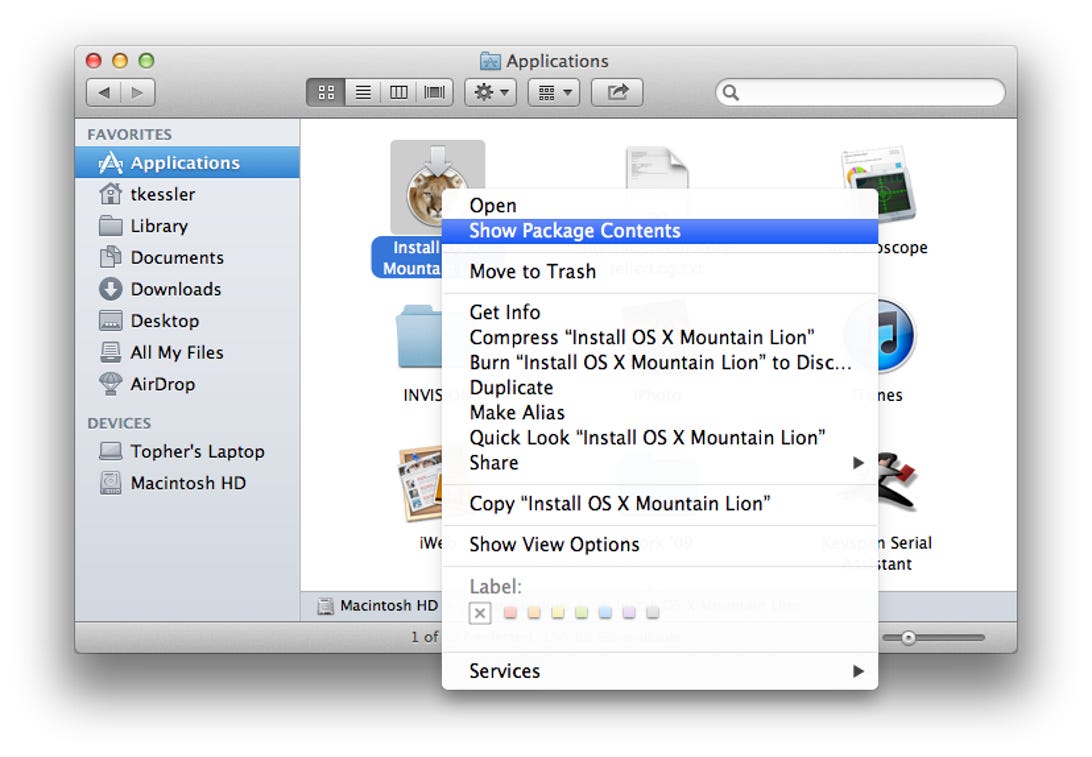
Purchase and download Lion from the Mac App Store (or use your up-to-date redemption code), and when the download is finished, the Mountain Lion installer will load. Quit the installer (press Command-Q) and get to the Application folder on your system.Locate and correct-click the Mountain Lion installer to bear witness its contents (click for larger view). Screenshot by Topher Kessler/CNET If you have already installed Mountain King of beasts, the installer will have been automatically deleted from your system. In this case, yous tin can get to the Purchases section of the App Store and redownload the installer.
Right-click the "Install Mac Bone Ten Mount King of beasts" application in the Applications binder, and choose "Show packet contents."
In the new window that opens, get to the Contents > SharedSupport folder and locate the file called "InstallESD.dmg."
Open Disk Utility (in the Applications > Utilities folder) and elevate the InstallESD.dmg paradigm to the device sidebar, where it should appear under your various disk and volumes listings.
In Deejay Utility select the InstallESD.dmg file, and so you lot tin click the Burn icon in Disk Utility's toolbar to burn the image to a DVD (unmarried-layer iv.7GB discs do not have enough space, then utilise dual-layer 8.5GB discs). If yous wish to create a USB or FireWire install drive instead, then continue on to step 6.
Connect a spare USB or FireWire drive that has at least 6GB of chapters, which should prove up in Deejay Utility. Optionally partitioning information technology past selecting it and using the Partition tab to split it into ii logical volumes (1 for the Mount Lion installer and the other for extra storage infinite) by clicking the plus button to create a new sectionalisation, and so setting the first partitioning to exist 4.8GB in size.
Elevate the destination drive to the Destination field, and drag the InstallESD.dmg paradigm to the Source field. Screenshot by Topher Kessler/CNET
Select the InstallESD.dmg file in Disk Utility and click the Restore tab that appears in the main Deejay Utility window. When you practice this you should see the disk image announced in the Source field, just if non and then drag it there.
Drag your destination bulldoze (the desired USB or FireWire bulldoze volume) to the Destination field, and so click the Restore button. Ostend you would similar to do this, and when complete you should have a fully bootable Mountain Lion installation bulldoze.
This process should work as described but the restoration process could neglect with an error. Y'all tin can overcome this by showtime mounting the InstallESD.dmg file and then using the mounted volume as the Source for the restoration, instead of the disk epitome file itself.
If restoring the InstallESD.dmg file directly does not work, then showtime mountain information technology and restore the "Mac OS X Install ESD" volume that appears (click for larger view). Screenshot by Topher Kessler/CNET
To exercise this, kickoff select the InstallESD.dmg file in the Deejay Utility sidebar and click the Open button in the Disk Utility toolbar. When mounted, you will see a book name appear chosen "Mac Bone Ten Install ESD" underneath the epitome file. In the Restore tab in Disk Utility, drag this new volume to the Source field, and then echo step eight above to restore it to your drive of option (special thank you to MacFixIt reader Michael A. for this tip).
When Disk Utility creates the drive in this manner, all files on it will be erased and replaced with the restored data; however, if you initially partitioned the drive (run into step 6 above), and so you can still employ the drive's secondary volume for other purposes in addition to being a Mountain Lion install source.
Sentinel our easily-on Commencement Look of Mountain Lion:
At present playing:Picket this: Bone Ten Mountain Lion


Post a Comment for "Mac Os X 10.8 Installesd.dmg Download Updated"